Here is my reflection on my cooking experiments in a 20% Time Project. At the end of my project I shared photos of my journey on Instagram and Storified my Instagram messages.
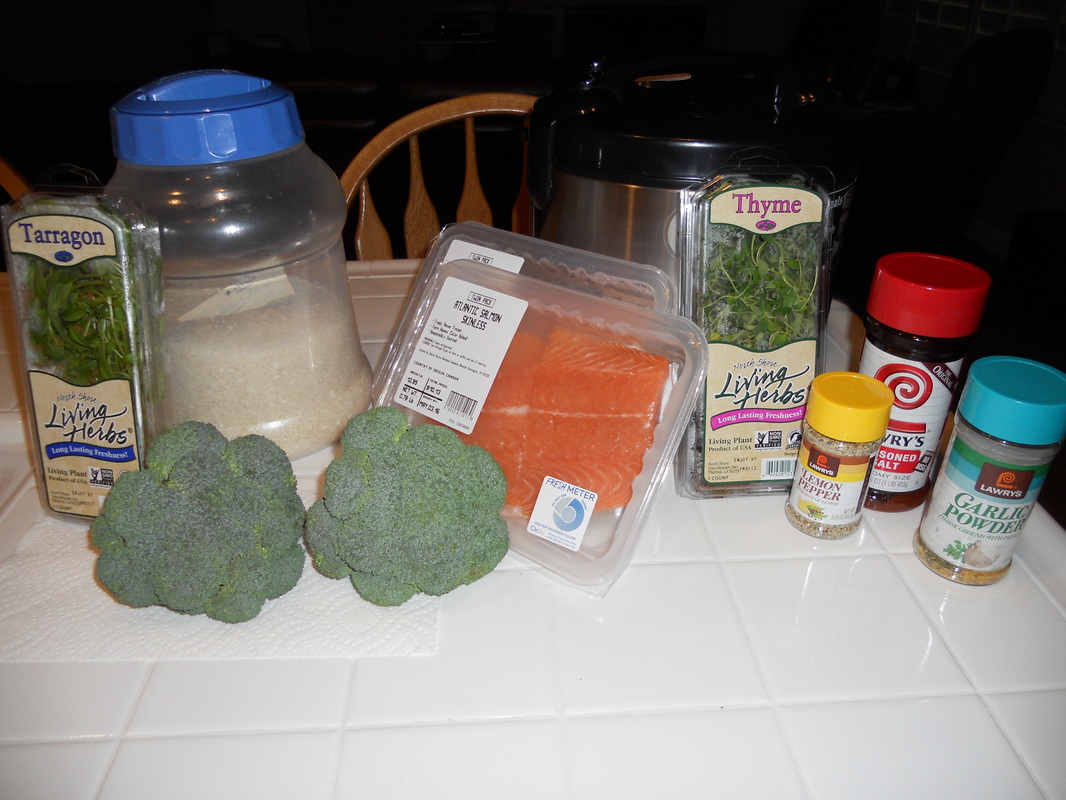
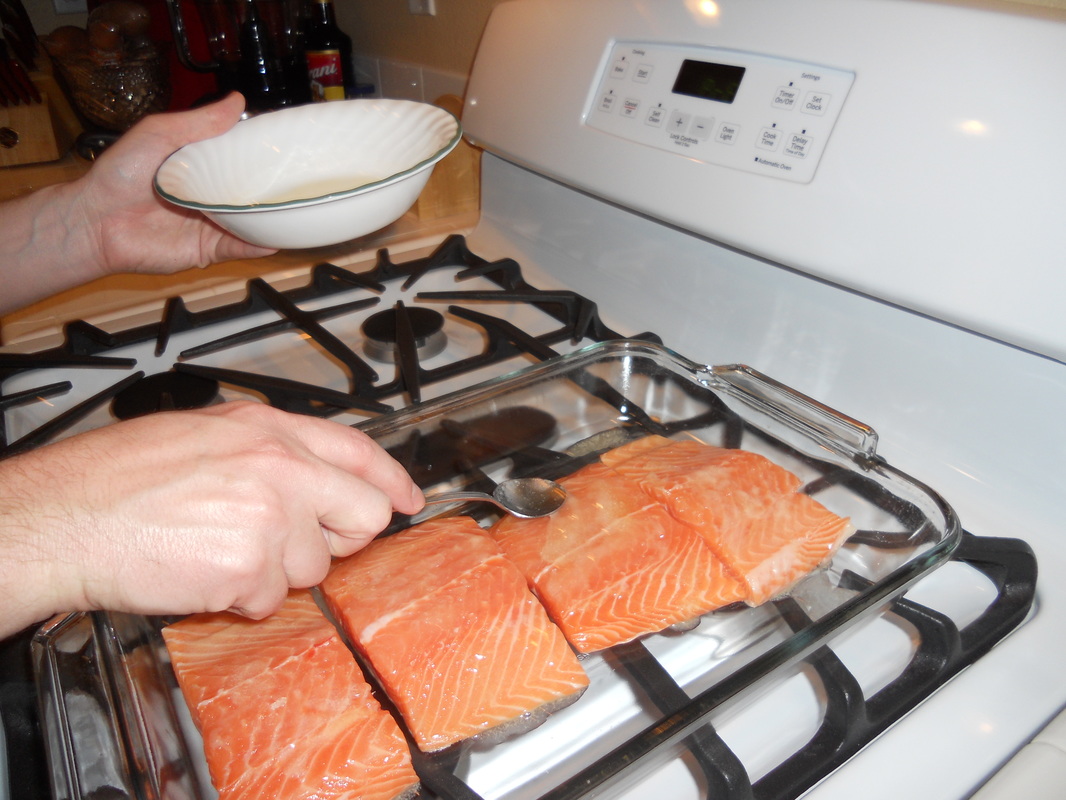
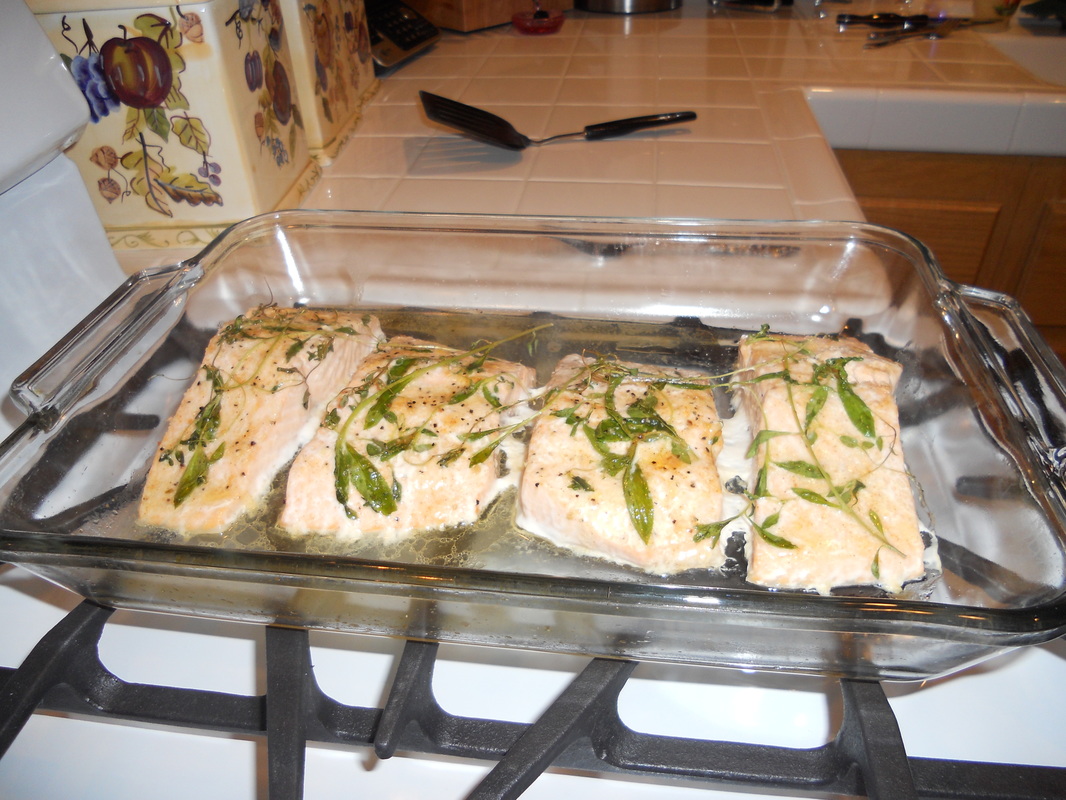
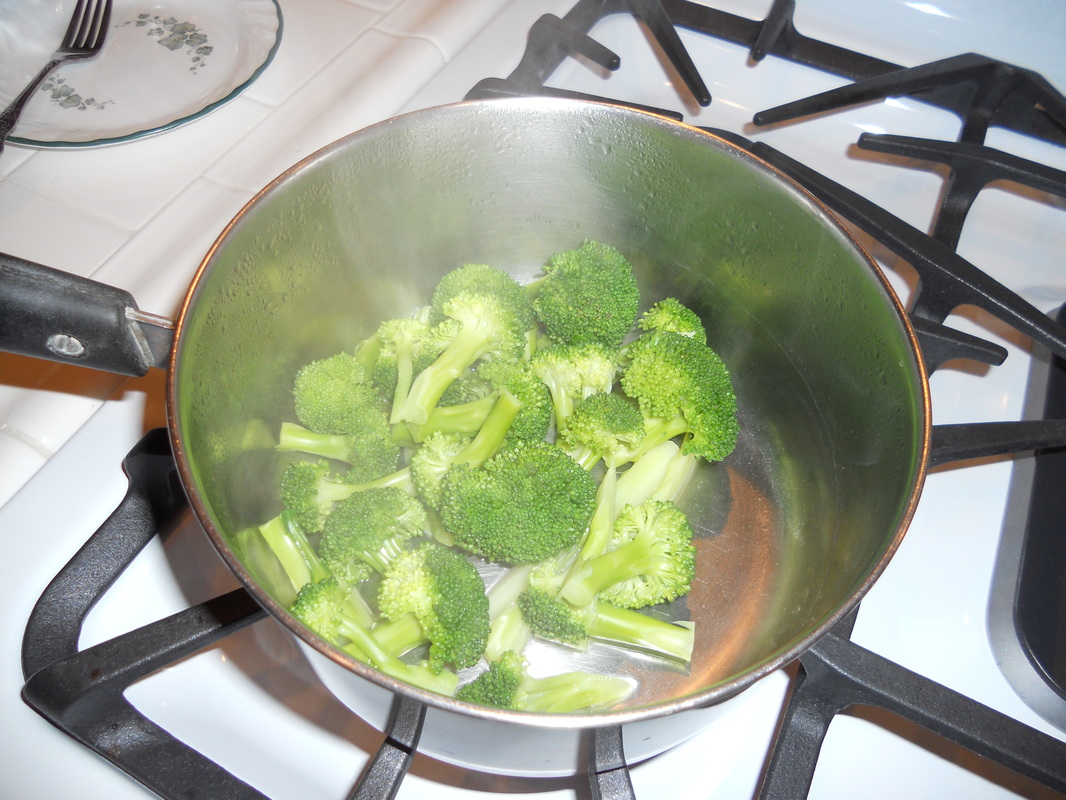
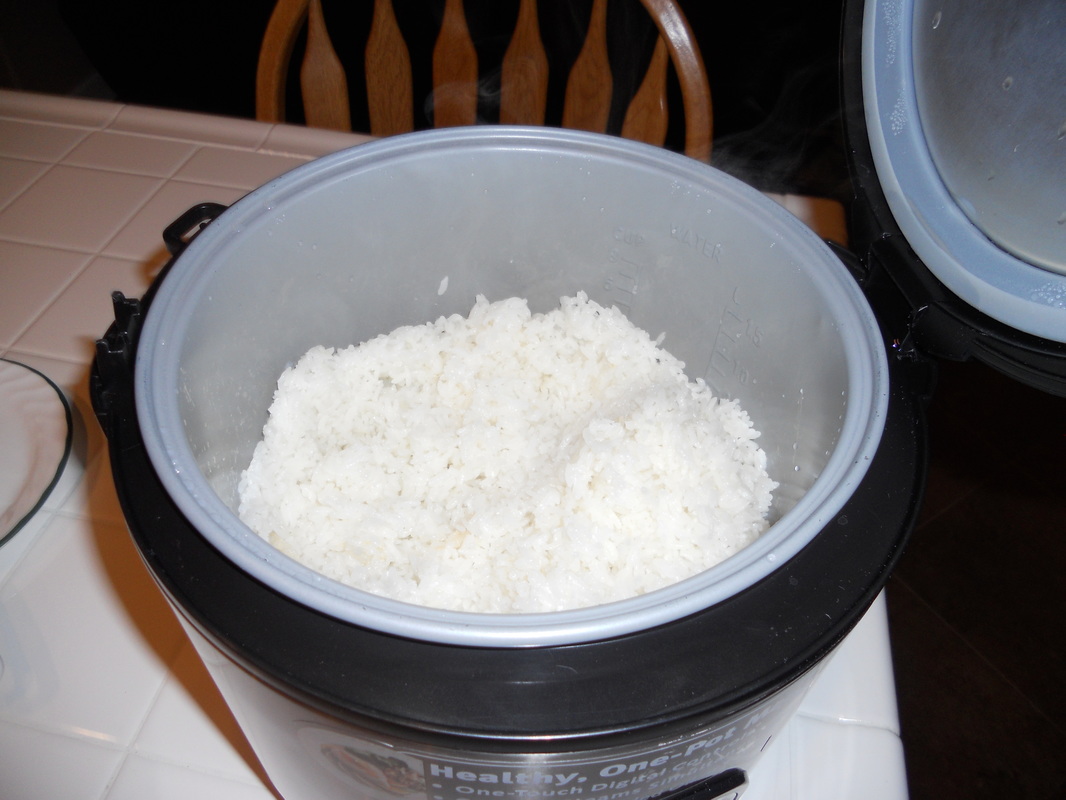
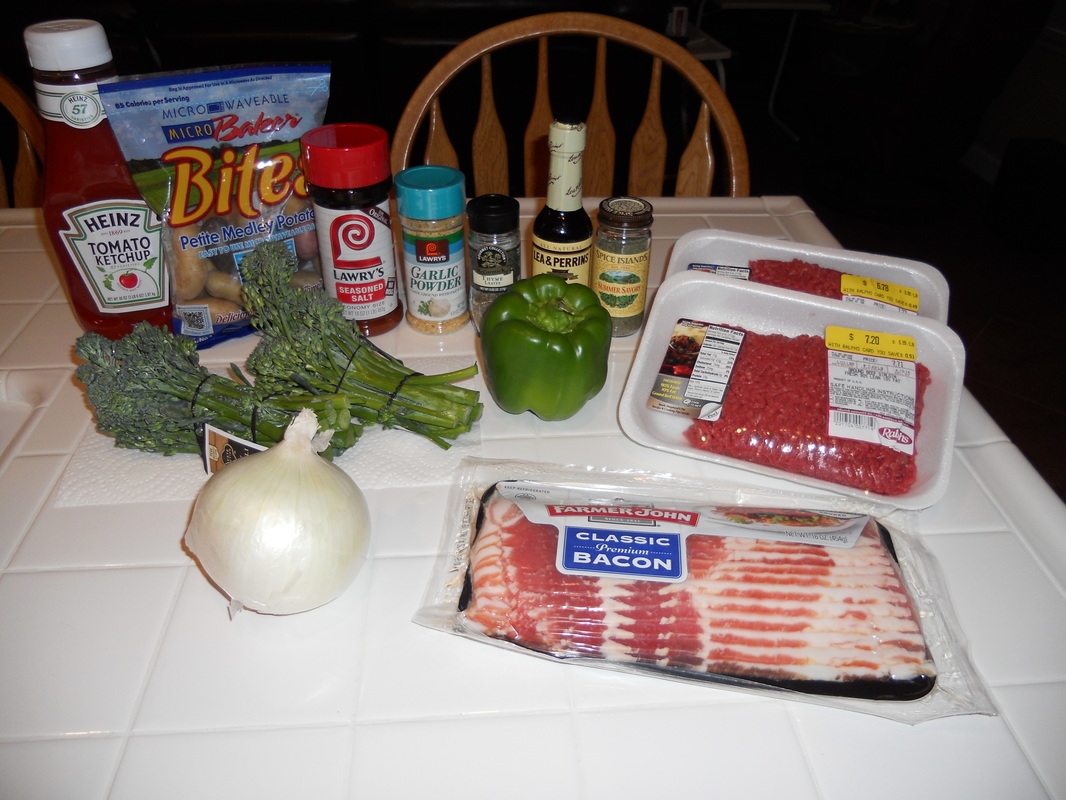
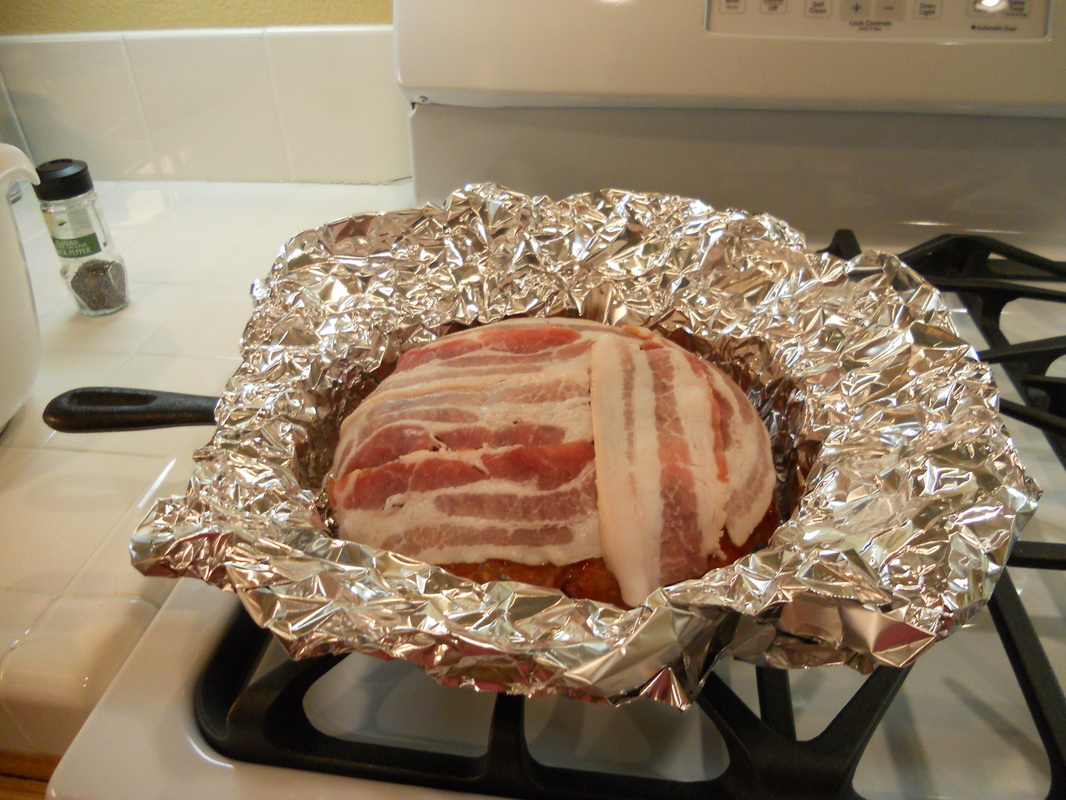
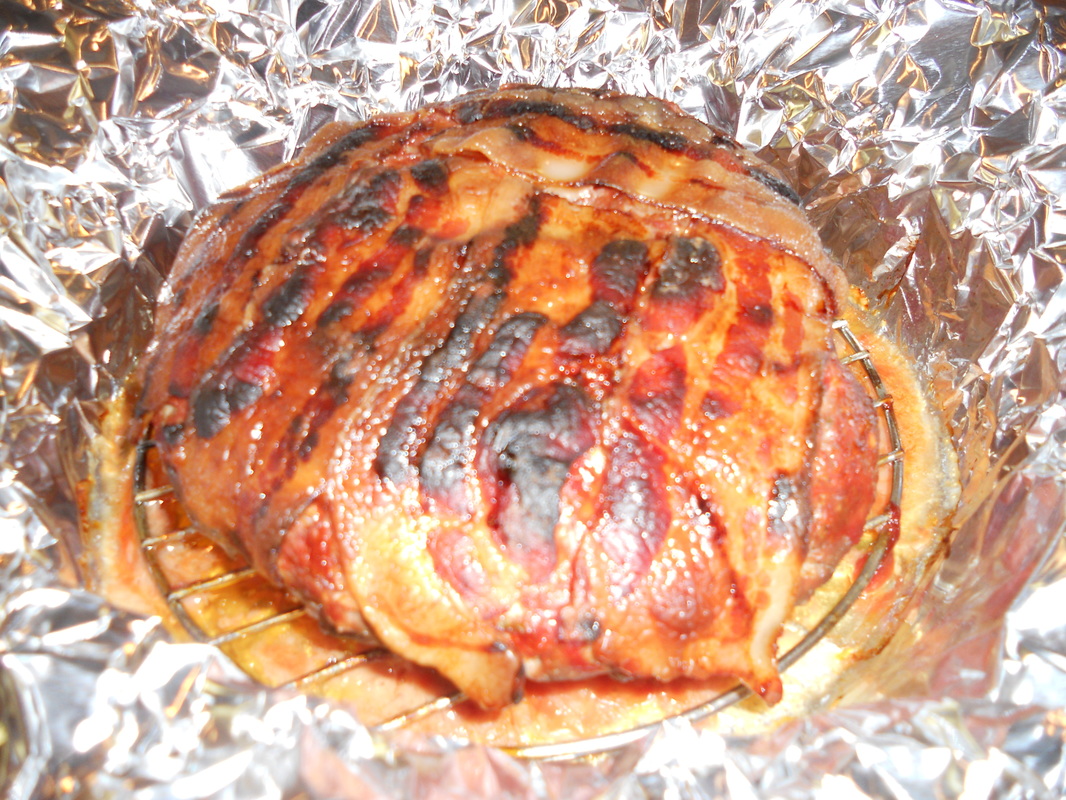
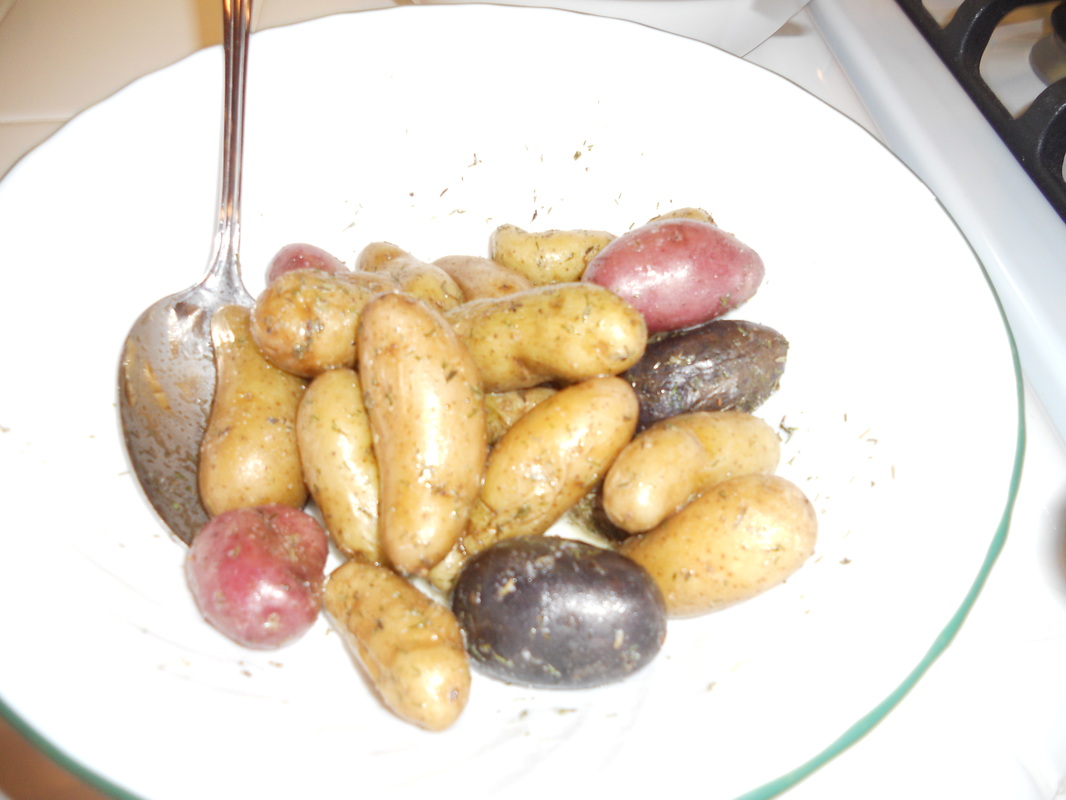
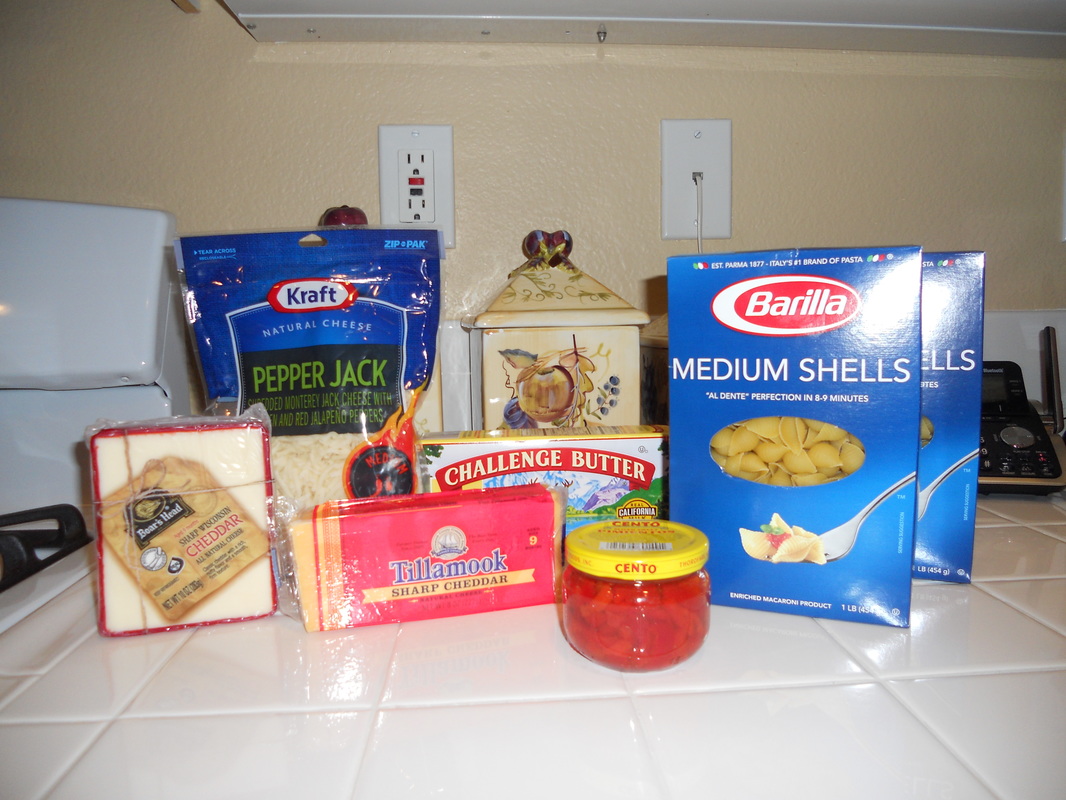
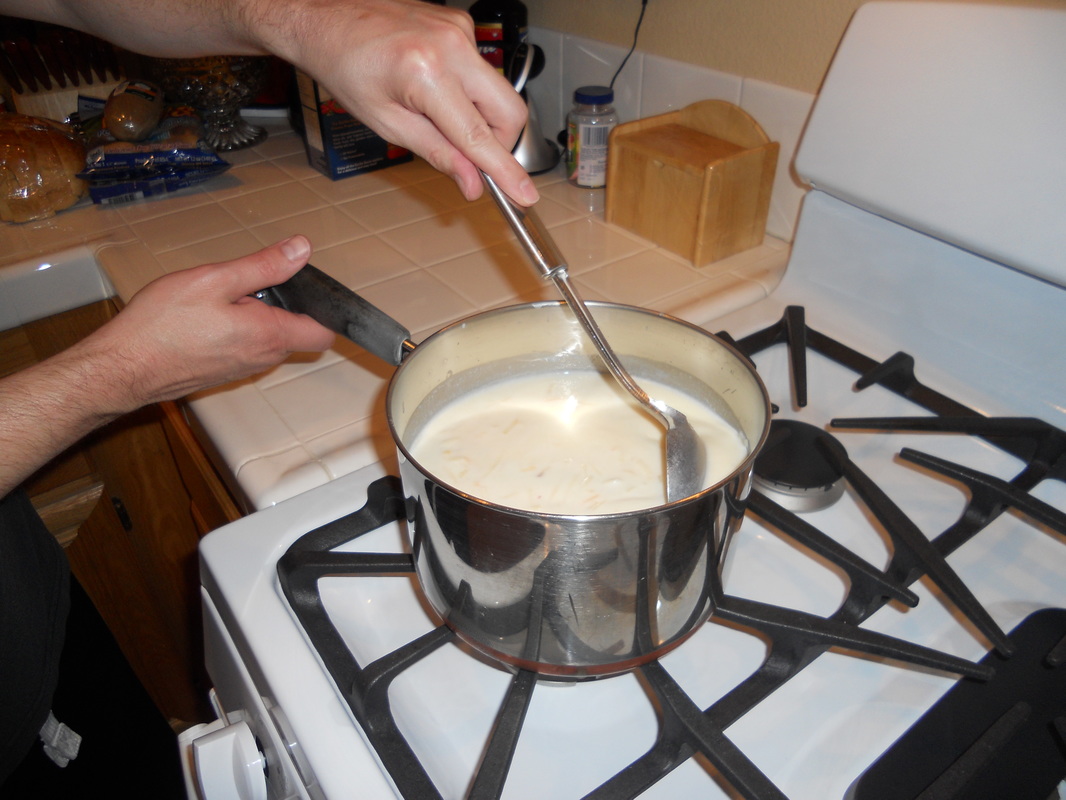
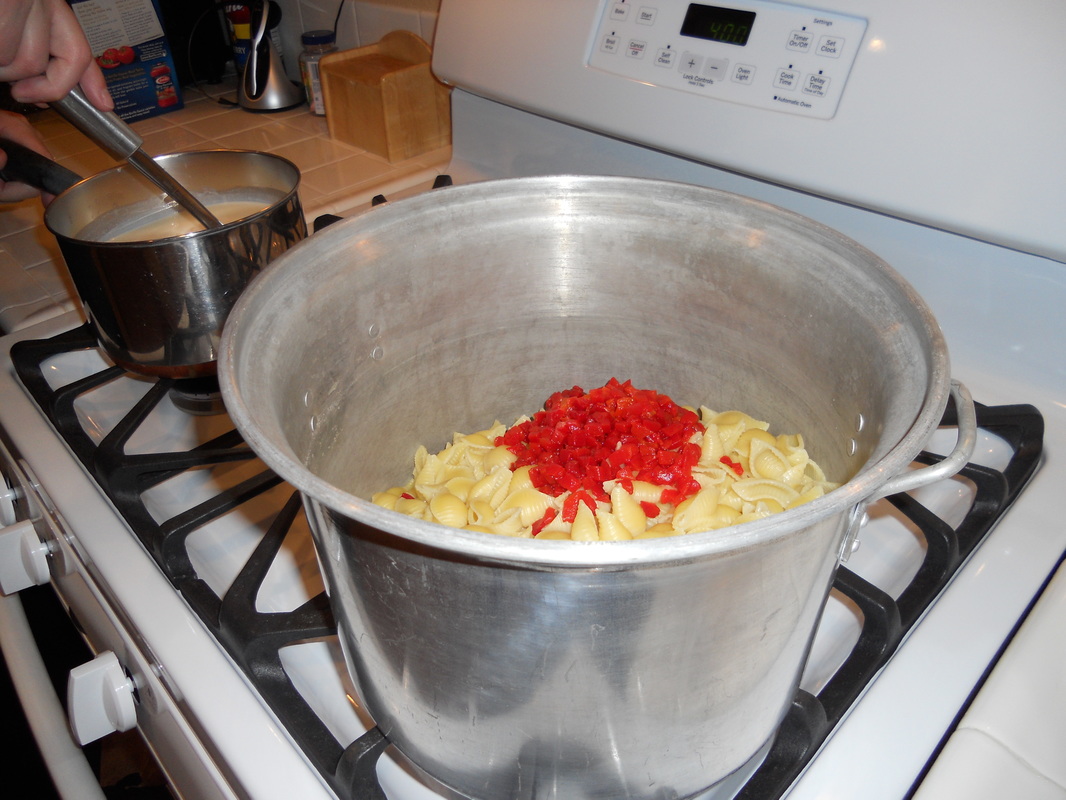
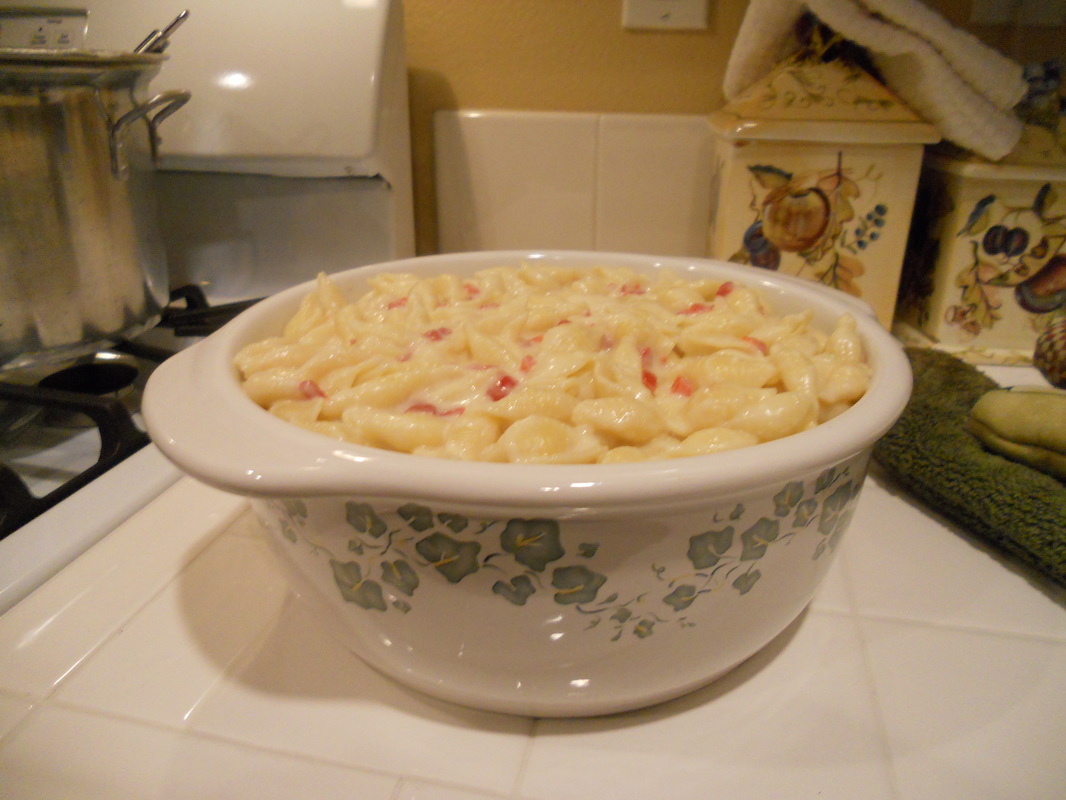
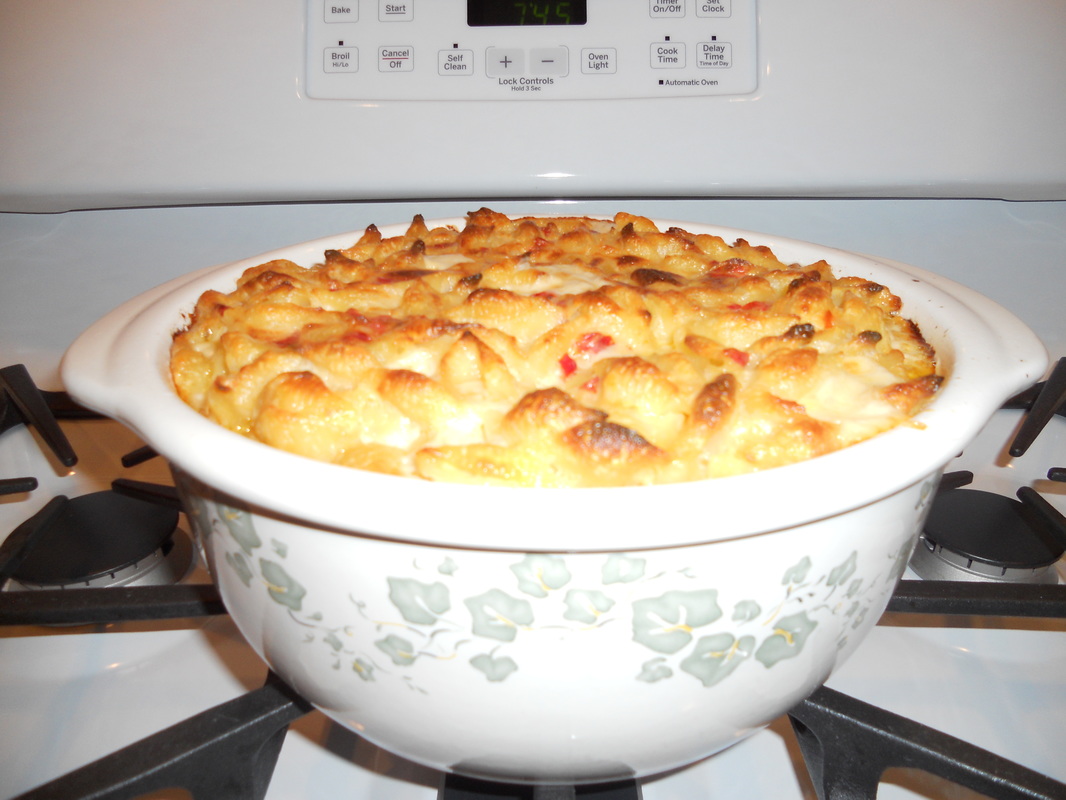
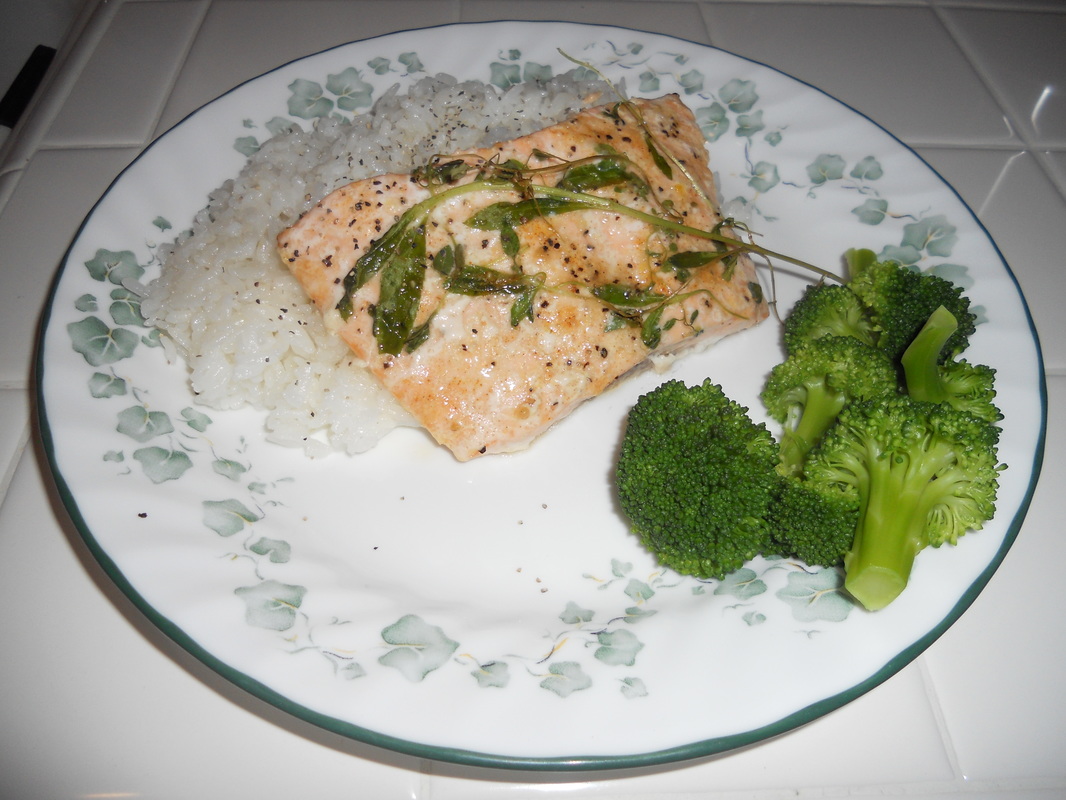 This is the last experiment for my 20% Time project! When I first considered cooking as one of my options, I mentioned that I had never made fish before. So for this week I made baked salmon, with white rice and broccoli. There were several good recipes for baked and grilled salmon I found on the Internet, but since I don't have a barbecue I chose to bake. At the store I picked up some skinless Atlantic salmon and some fresh herbs. This is the first time I have used fresh herbs in my own cooking. The herbs I selected are tarragon and thyme, which go nicely with salmon and other meats. To accompany the salmon, I wanted to make rice and bok choy. I have eaten bok choy several times and I like it a lot, but I ended up going with broccoli since I already had some and I didn't want it to go to waste. The first thing I started is the rice, which takes the longest but is the easiest to prepare. After rinsing off the rice in a strainer basket, I put it into the pot that goes in my rice cooker. I just followed the directions that came with the rice cooker for how much water to add into the pot. From that point on the rice cooker did all the work. It only took about 30 minutes for the rice to cook, but the entire meal was ready by the time the rice was finished. Once the rice was started, I started prepping the salmon. First I placed the salmon into a rectangular baking dish. Then I melted some butter in the microwave and used a spoon to pour butter onto the salmon. I also used the spoon to smooth the butter around on top of the fish. From my fresh herbs I cut off several sprigs of thyme and tarragon and rinsed them off. Then I lay the sprigs across the salmon, when it dawned on me that I had not used any of my other seasonings. I sprinkled seasoned salt, a very small amount of garlic powder, and some lemon pepper onto the fish. Putting the seasonings on after the butter and fresh herbs doesn't really affect the flavor of the fish, but the herbs got in the way as I was sprinkling and made it more difficult to see how much I had already seasoned the fish. Once the fish was all seasoned up, I covered the baking dish with some aluminum foil and popped it into the oven at 350 degrees Fahrenheit for 25 minutes. Next it was time to start preparing the broccoli. First I cut off the end of the broccoli, only about two or three millimeters worth. Then I rinsed off the broccoli and began cutting off florets with the stems. From there I placed the broccoli into a medium saucepan and filled it with water just until the broccoli was first covered. I added a little salt, but I still had 20 minutes on the timer for the salmon, so it was too soon to start cooking the broccoli. I had to let the broccoli sit away from the stove for a few minutes before I started it, otherwise it would cool off while waiting for the fish and rice to finish. After about 10 minutes I placed the broccoli over a high flame. It took about five minutes for the water to begin boiling, at which point I covered the pan with a lid and set the flame to low. About four minutes later I removed the broccoli from the stove to empty the water. Shortly after that the timer for the salmon went off, and I removed the salmon from the oven. Checking it with a fork, I found the salmon appeared to be fully cooked as it had lost the pink sushi look inside. Overall it took about 30 to 45 minutes once I began preparation until I was able to sit down and eat, but out of all my experiments over the past several weeks, this was surprisingly the easiest. I will have to make fish again very soon. What a success! 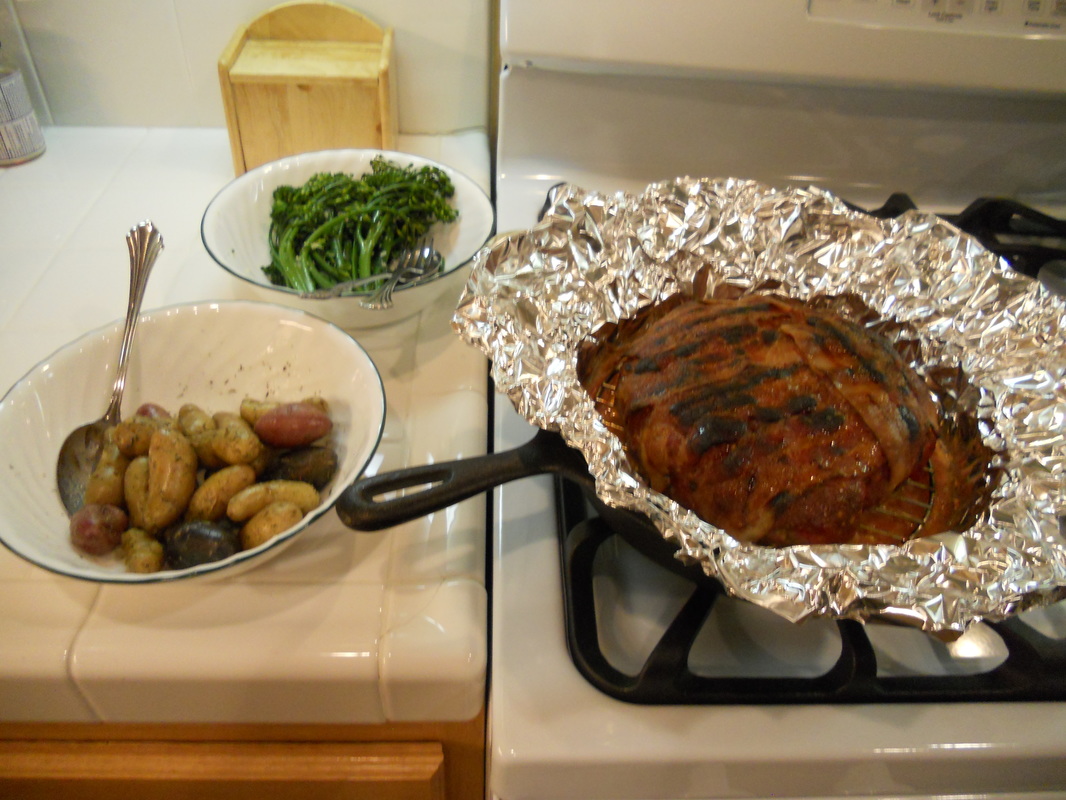 I love meatloaf, and I haven't had it in quite a long time. So this week I decided to make one. Since meatloaf alone is not a full meal, I thought about making potatoes and green beans to go with it. As I investigated several meatloaf recipes online, I noticed that they all have something in common. Every recipe I read called for bread, crackers, bread crumbs, or even oats. Meat alone can become quite dry when cooking in the oven, but bread, crackers, and oats are used to hold in moisture. This is why recipes for meatballs often call for bread crumbs or something of the sort. During my trip to the grocery store I had to make a last minute adjustment to my meal plans. The green beans did not look good, so I picked up some broccolini instead. I forgot to get potatoes, but fortunately there was a bag of small potatoes already at home. These potatoes were an assortment of red, white, and blue potatoes and each one is small enough to be eaten in one to three bites. I used a lot of ingredients in my meatloaf, going beyond the recipes I found in my research. I added a small amount of green bell pepper, thyme leaves, garlic powder, and dill weed. I also used crackers instead of bread, oats, or bread crumbs. Once I had all the ingredients in the bowl with the meat, I mixed it all up with my bare hands, making sure the evenly distribute the seasonings, onion, and bell pepper. After placing the meatloaf in an iron skillet and topping it with some ketchup, I covered the meat with strips of bacon. The meatloaf had about 25 minutes left to cook in the oven when I started making the sides. I chopped off the bottom ends of the broccolini and placed it in a pot of water. Once the water was boiling, I turned down the heat to low and let the broccolini cook for a few minutes. Preparing the potatoes was simple. The bag I bought is intended for the potatoes to be cooked in a microwave oven for four minutes. After heating them up, I had to let the potatoes sit in the microwave oven for a couple minutes before removing them. Afterwards I placed them in a bowl, gave them a few pats of butter, and seasoned them. When the sides were done, the meatloaf was not quite ready, so I had to let it cook for another five minutes. In my 20% Time experiments, this is the first full meal consisting of side dishes that I have made. There was quite a bit of work to it, and it could easily have gotten overwhelming. But I learned this--if you're going to make more than one side dish at the same time, make sure they are both easy to prepare without too much micromanagement. This way you're much less likely to overcook one thing because you were too busy managing another. 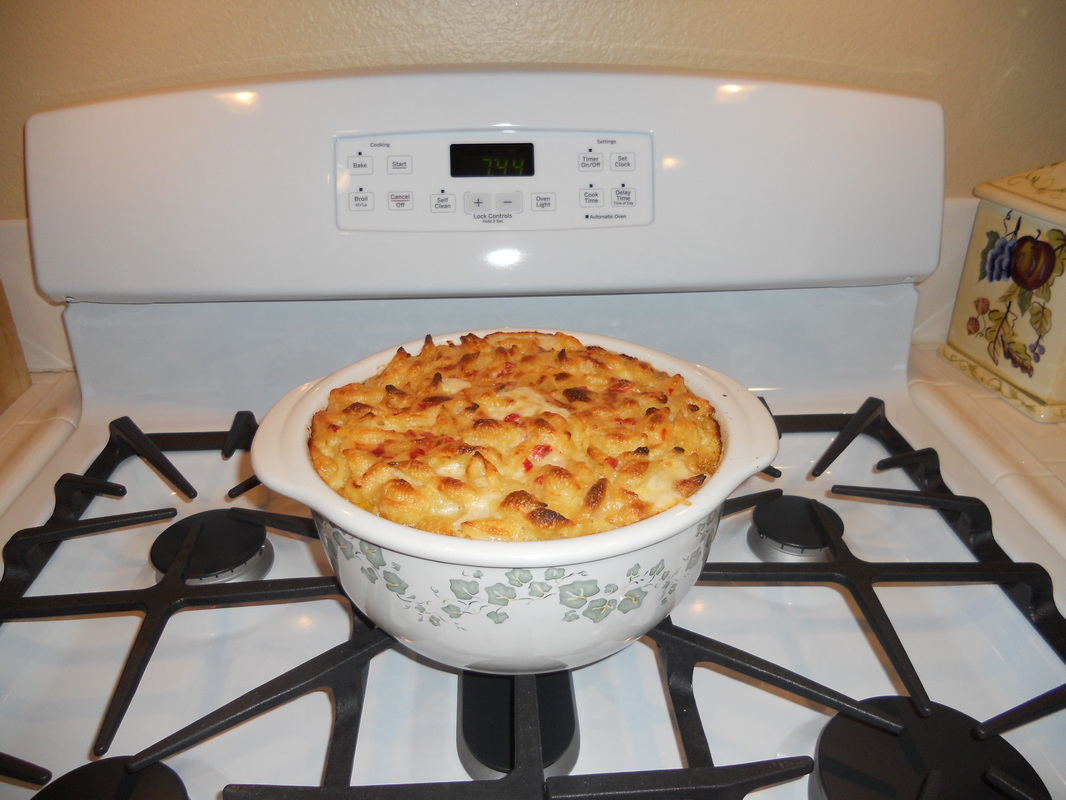 This week I decided to cook some comfort food. All my life my mother has made the best macaroni and cheese I have ever had, and now I've learned how to make it. So this also provided me with a great opportunity to collaborate with my mom and try something new. Rather than use the traditional elbow macaroni, we chose to use shells. Mom has used shells before, but the last several times she prepared macaroni and cheese she used rotini. Mom's recipe has evolved over the years in other ways too. Sharp cheddar cheese is a staple for this dish, but Mom has added other cheeses as well. For my first experience cooking macaroni and cheese, I used sharp cheddar, sharp white cheddar, and pepper jack. The sharp white cheddar is a new addition that even my mom had never used before. To prepare for cooking I used a food processor to shred the two types of cheddar. Shredding the cheese makes it much easier and faster to melt into a cheese sauce. Afterwards I used a stock pot to boil water for the macaroni shells, and Mom put in a small amount of salt. I then began cutting up the pimento, which is a special ingredient for this dish, and during this time Mom took the grated cheese out of the food processor and dumped it into a large mixing bowl. She then added some pepper jack cheese and mixed the three kinds of shredded cheese. Before I began cooking the cheese sauce, the shells were cooked so I used a colander to completely drain them. Once drained, I put the shells back into the stock pot and poured the cut up pimento on top of the pasta. One thing that makes this dish so special is the cheese sauce. Many of the recipes for macaroni and cheese that I found online have one prepare a roux, which is a mixture of flour and some kind of fat that is used to thicken a sauce. For the roux I melted butter and salt with some flour, and prepared the cheese sauce in the same saucepan. To the roux I added plenty of milk, and then the mixture of shredded cheeses. This cheese, milk, and roux mixture must be continuously stirred so it does not burn on the bottom of the pan. About the same time that I noticed the cheese had melted almost completely, I discovered that the consistency of the sauce was changing. As I stirred it until it was boiling, the sauce thickened up quite well. Finally the cheese sauce was boiling, and it was time to pour it into the stock pot. Then I mixed the sauce with the pimento and pasta, and poured the mixture into a large casserole dish. You can see my macaroni and cheese at this stage in the above picture on the left. I popped it in the oven at 400 degrees for 30 minutes and worked on some homework. When the 30 minutes were up, the macaroni and cheese had a little bit of brown on the top, which indicated that it was not yet done. So I kept it in the oven for another 13 minutes. You can see it when it first came out of the oven in the above picture on the right. It turns out the white cheddar was a good addition and the flavor was great. And the browned top was all crunchy, which is my dad's favorite part.
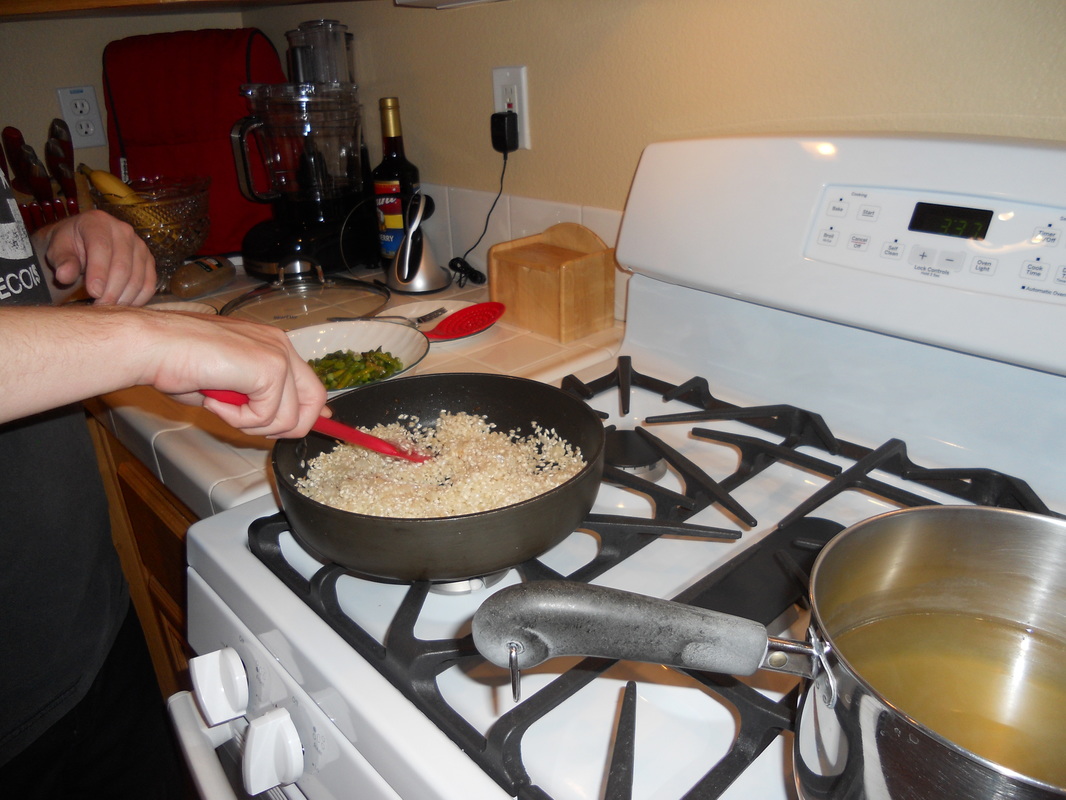
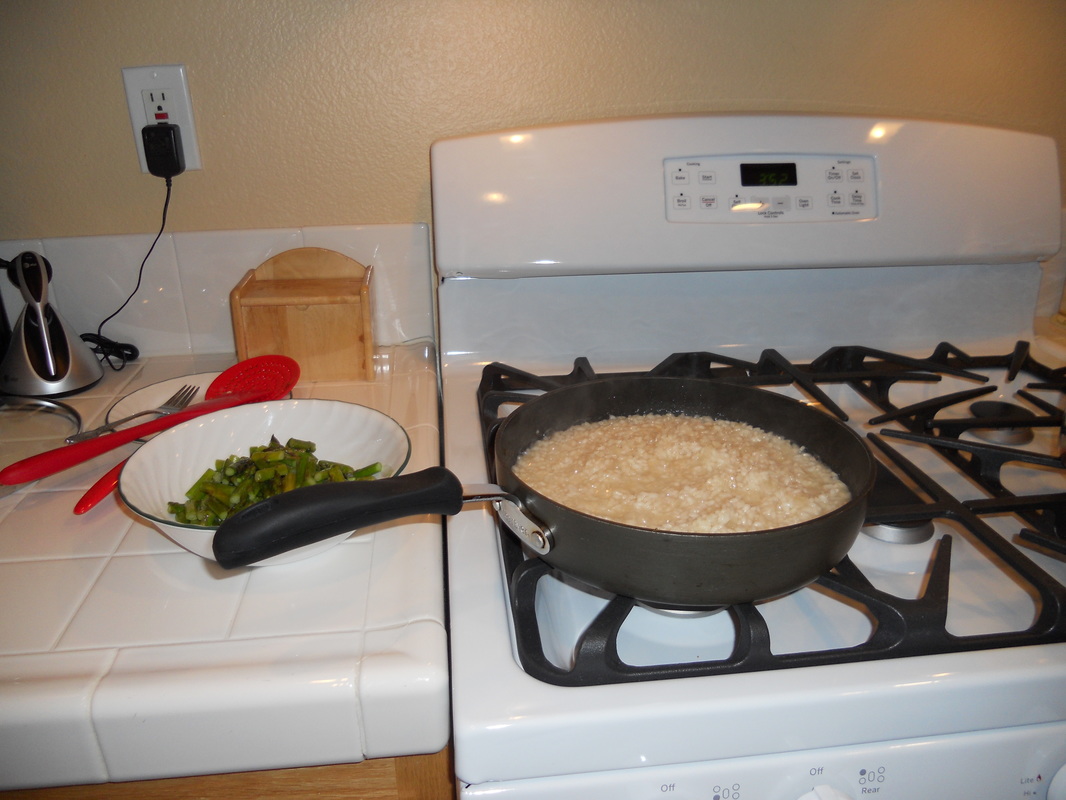
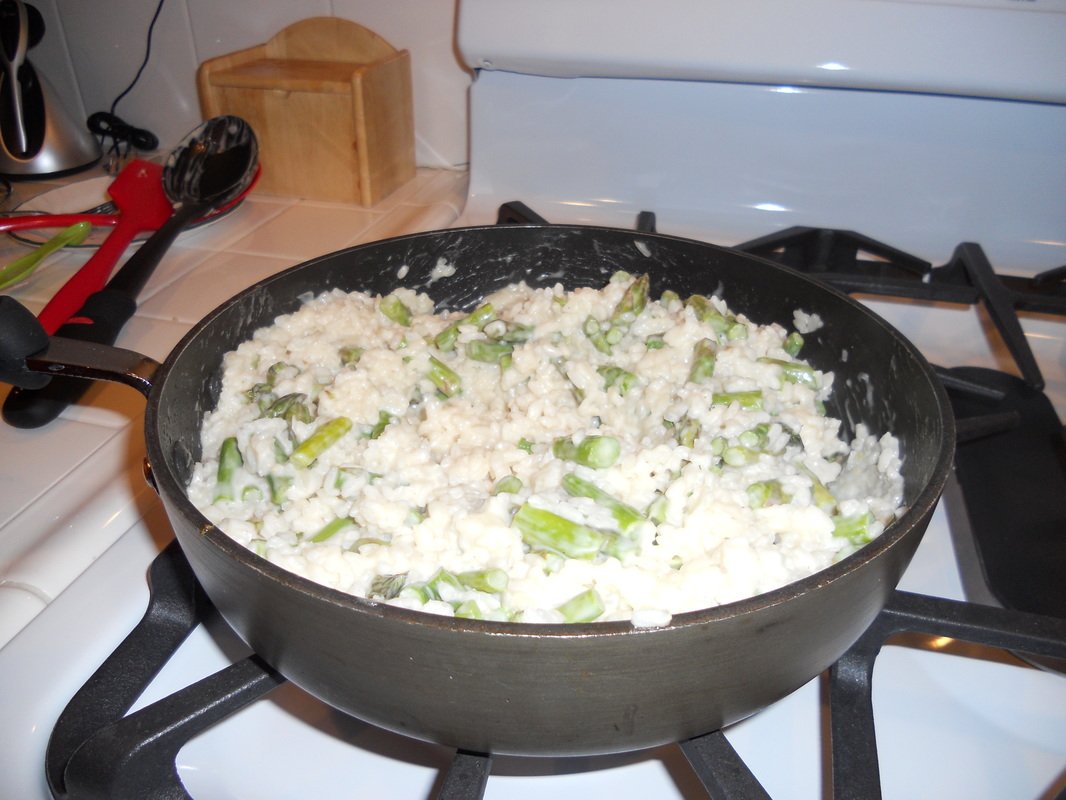
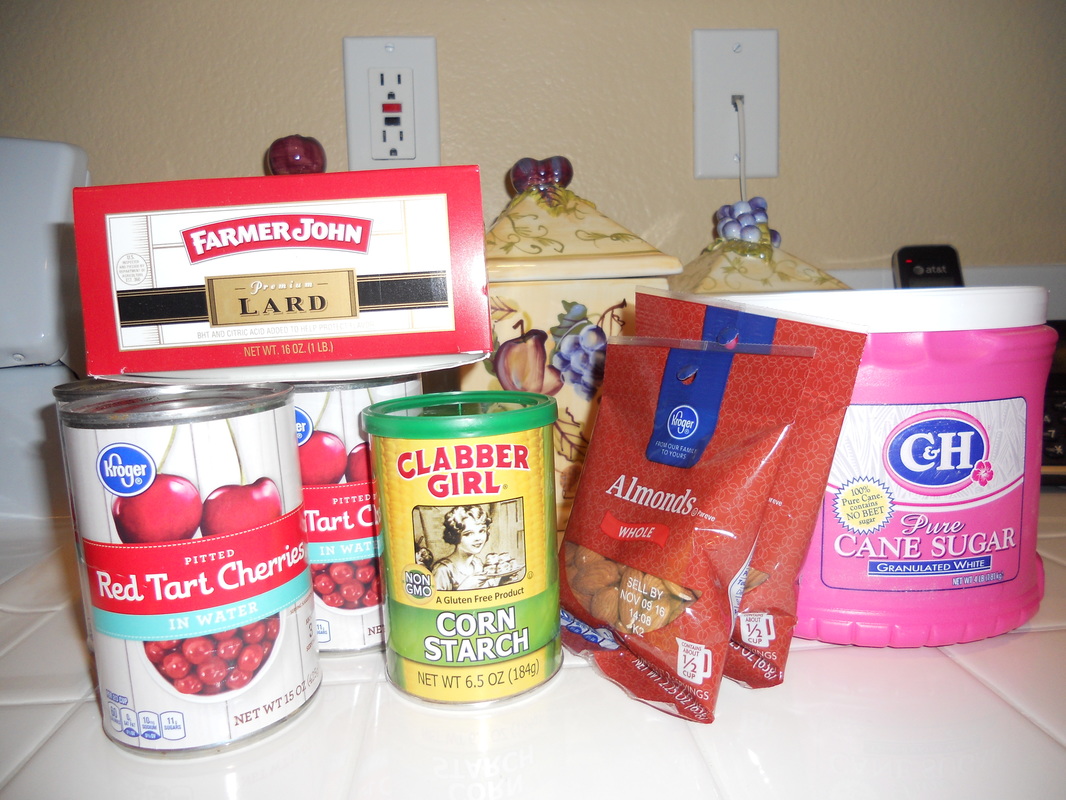
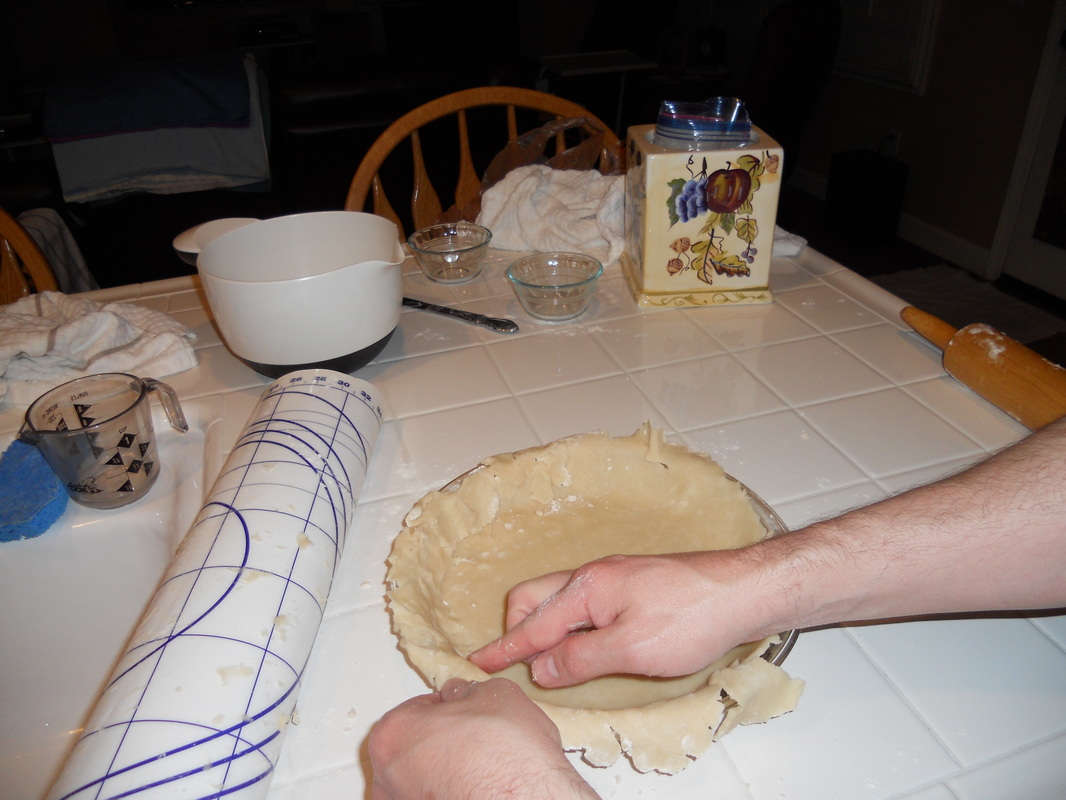
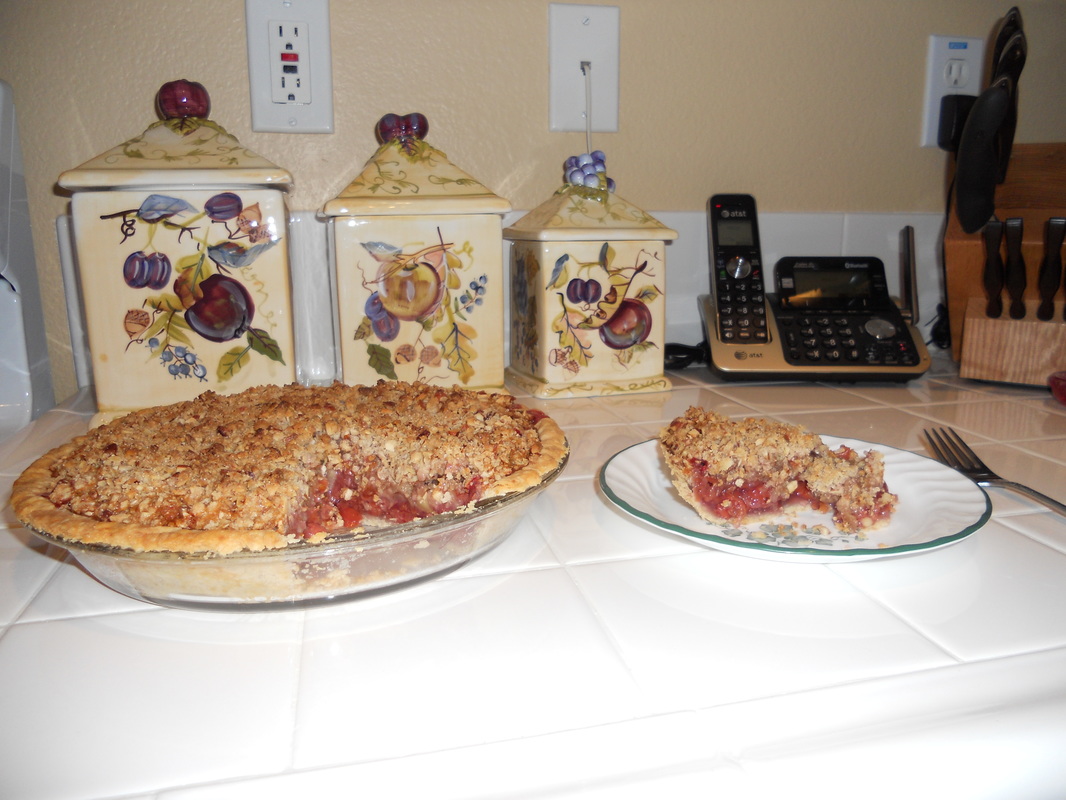
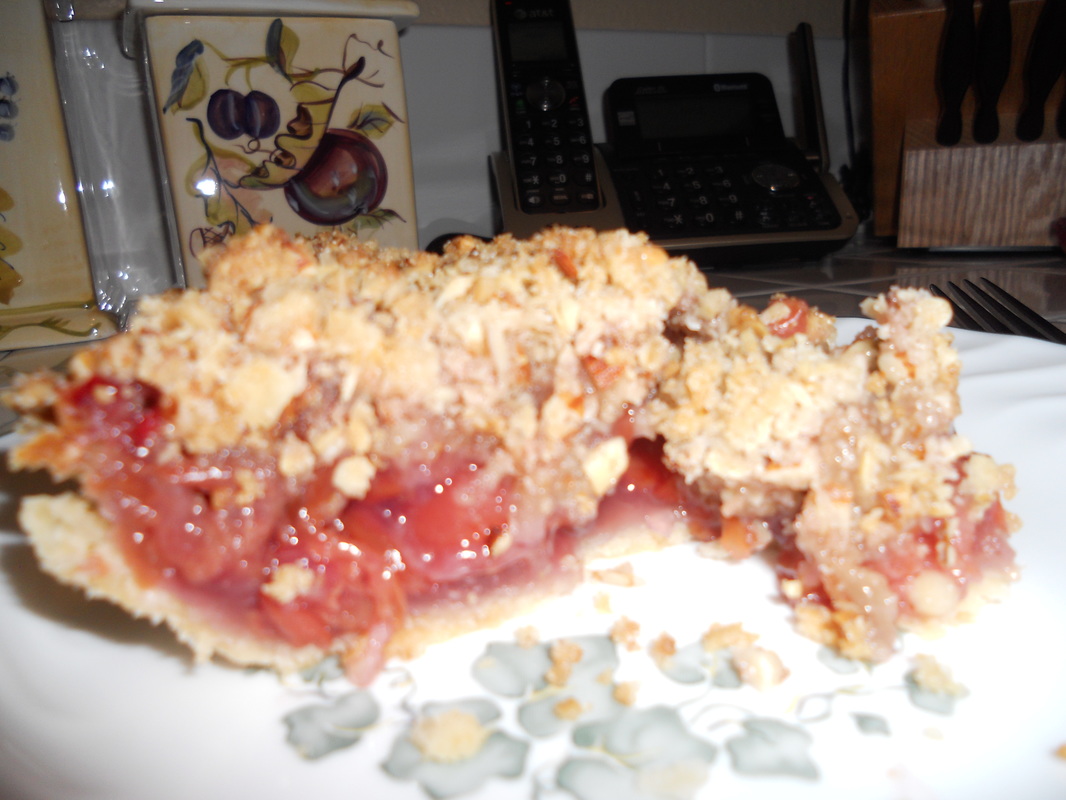
So in this experiment, I learned what a roux is and how to make it. I also learned that sharp cheddar keeps its cheese flavor better than milder cheddars in this dish and how to make a cheese sauce. But most importantly I learned how to cook something that I love to eat and something that both adults and children like to eat. This macaroni and cheese was rather fun to make, and not quite as difficult as the risotto that I made last week. I'm very happy with how it turned out. 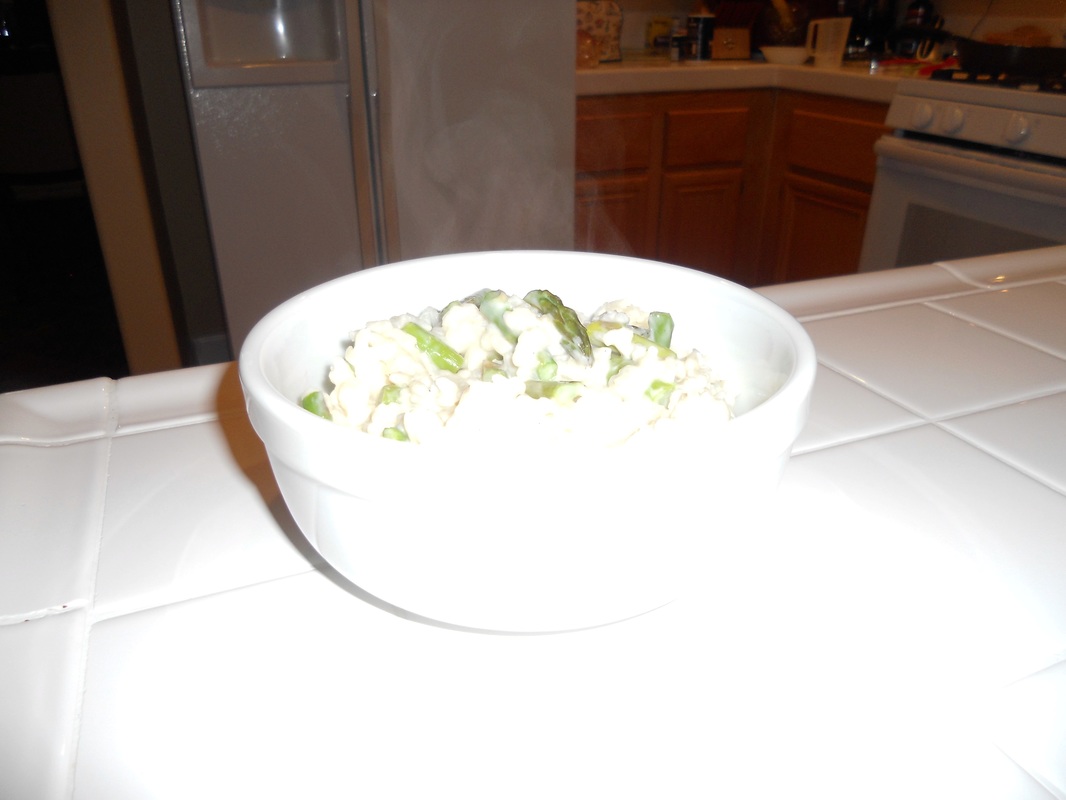 This week I decided to try my hand at asparagus risotto. A few years ago I went to a dinner gathering in which Chef Martin Corso (Chef Marty) prepared several dishes throughout the evening. One of the dishes Chef Marty made is asparagus risotto, and it was delicious! So I researched this week about how to cook risotto and investigated several different recipes. The recipe at the end of my post is the one I chose to prepare, and I got it from a coupon book for Ralph's supermarket. The risotto was fun to make, and not as challenging as I thought it would be. I have seen chefs on television shows, such as Fox's Hell's Kitchen, and so many experienced chefs screw up their risotto. I've seen these chefs make risotto that is hard like a brick or so runny it could be considered a stew. I wanted mine to be at least decent, so I made sure to look for proper techniques to cook risotto. At foodnetwork.com I found a wild mushroom and asparagus risotto recipe with a three minute video in which Chef Alton Brown demonstrates how he prepares it. One technique I noted is that when he pours in the liquid, he pours in just enough to cover the rice. Another technique that Brown uses is that he heats up the wine and chicken broth before he pours them into the rice. Most importantly, Brown states, "If you see anything turn brown, turn it down," meaning that if the rice is browning then you have to turn down the heat. I learned from Brown that I'm not supposed to brown the rice, but rather I want the rice to become translucent along the edges while it "sweats" with the butter and onion. One thing I did to make my job easier is I used Stella shredded parmesan cheese that I found in the refrigerated section of my local grocery store. I am curious how different would my risotto taste if I had shredded the parmesan myself, or if it would taste different at all. I don't know wines too well, and I needed some help choosing a dry white wine. My dad selected for me a 2005 Viognier from Ile La Forge. The risotto came out pretty good. It was neither hard as a brick nor was it soupy. My parents both liked it, and so did I. We decided to keep this recipe, but it needs some tweaking. My parents both thought the amount of asparagus should be reduced, and I was concerned that more salt may be necessary. Still, all three of us liked the risotto very much and would prepare it again, which is the true test of cooking success. As for the ease of cooking risotto, I know it was a lot easier for me than for other people because I was cooking only risotto, not a full dinner. I didn't feel it was too much for me to handle just the risotto, but I'm sure I would be overwhelmed if I were cooking anything else while trying to make risotto.  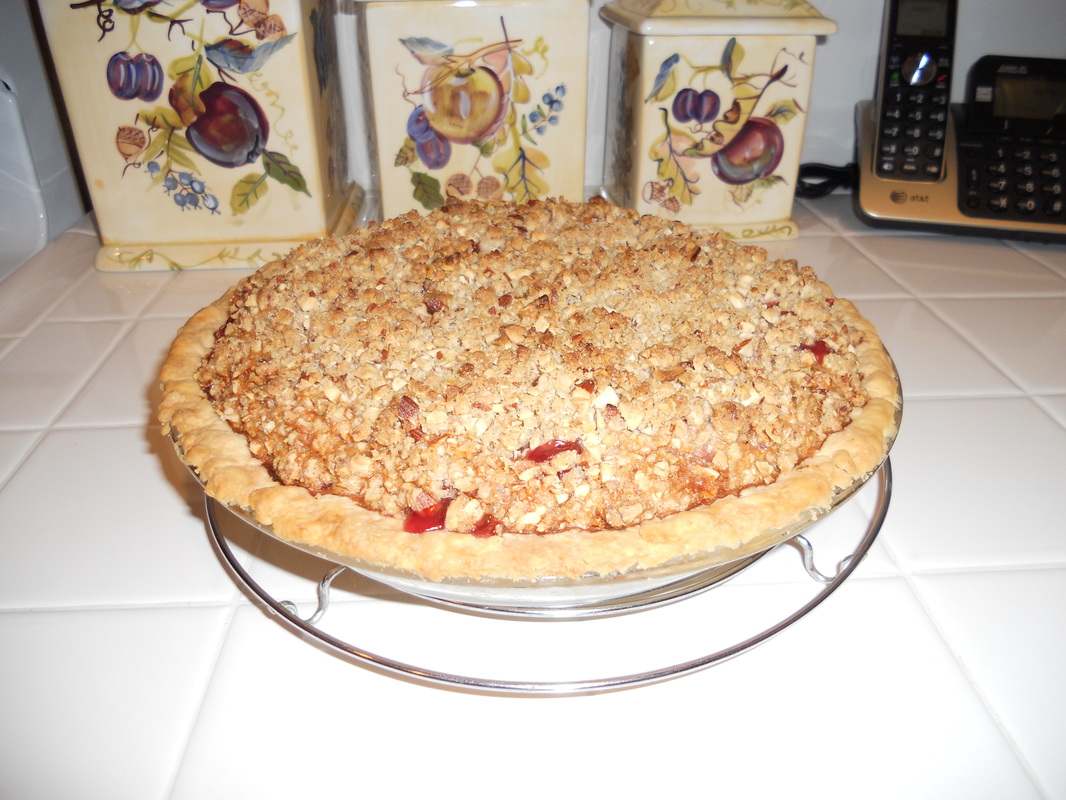 I have always liked cherry pie, but nobody in my family ever makes it. I found a recipe at smittenkitchen.com for a cherry pie with almond crumble topping. I found a couple other recipes for cherry pie with crumble toppings, but this one stood out to me more and I really liked the sound of an almond crumble topping instead of the traditional crust topping. So, to celebrate Pi Day, I decided that this week would be perfect for me to experiment with a cherry pie. Along the way I ran into a few problems. The recipe I adapted calls for sour cherries, which I had never heard of before. I've never seen them in stores, but I have seen Bing and Rainier cherries. I learned that both Bing and Rainier are types of sweet cherries, and they would not be ideal to use in this recipe because they would make for an overly sweet pie. Apparently sour cherries aren't in season until around June. I was worried that I would not be able to find the right kind of cherries. There were no cherries at all in the produce section, as I expected. I found frozen dark sweet cherries, but like Bing and Rainier, these would be too sweet. Fortunately, in the aisle with canned fruits and vegetables, I found red tart cherries packed in water. The bonus with these is that they come already pitted, so I wouldn't have to spend forever taking the seeds out of two pounds of cherries. So what else did I learn? The most important thing I learned is how to make a pie crust, which is arguably the most important feature of a pie. Rather than purchase a frozen or other kind of premade crust from the store, I made mine from scratch. And I made it with lard! After discussing my endeavor with my mother and my grandmother, they convinced me to use lard in the crust so it will be as flaky as possible. I also came across an online article in the New York Times in which a cooking expert describes his preference for butter or lard to make the best crust. My mother, wanting me to be successful with making a pie, suggested the pie crust recipe in her Betty Crocker's Cookbook. It turns out that making a pie crust is not that easy. I used a plastic pad to roll the crust on, and because I didn't refrigerate the lard long enough, parts of the crust stuck to the pad. In the picture above on the right, you can see me piecing the crust back together in the pie plate. Fortunately the dough was pretty moist, so it took minimal effort to get the pieces to adhere to each other. Another hurdle I had to overcome was with the almond crumble topping. Somehow I missed the part in the recipe that instructs me to either grind up the oats or use oat flour. I don't keep oat flour on hand and I wondered how necessary it was for me to grind up the oats. Seeing the chance to experiment more, I went ahead and used the oats as they were. To melt the butter, I simply cut it up into small pieces and placed them in a small pan. Then I heated the butter over the lowest fire possible on the smallest burner of my stove, being very careful to not burn the butter. The recipe says to cook the pie for 1 hour 10 minutes or until the liquid in the pie is bubbling. I set my the timer to go off after 55 minutes, and I cooked the pie another 5 minutes before taking it out. It looked good enough to eat and smelled delicious too. The crust was golden brown, definitely not burned. After letting it cool off for a couple hours, I ate the first slice, and I'm happy to say that it tasted good. In addition, the almond crumble topping was crunchy and the crust was flaky, just as I had hoped. Reference: Betty Crocker's Cookbook: New and Revised Edition. (1979). New York, NY: Golden Press. I have made my decision! For my 20% Time Project I am going to expand my cooking repertoire. Though I have experience cooking, my skills are quite limited and there are numerous foods I would like learn how to prepare. I have never made fish before, but I would love to learn how to cook salmon, or perhaps halibut. I would also like to learn how to cook some desserts, such as cherry or apple pie, and I was thinking about possibly preparing a pot roast or a turkey dinner. I must look more into what I want to learn how to prepare so that I can make my first selection. My other option for this project was to learn the violin. I'd still like to learn how to play this instrument, but I'll have to find some other time for it.
Option A: Cooking
I have some experience cooking, but it's pretty limited. I have prepared chicken before and I am pretty good at making certain kinds of cookies and fudge. However, I have not learned how to prepare fish, and there are lots of dishes I have never cooked before that I would like to learn. Questions: 1. On which types of dishes should I focus my attention--main dishes, desserts, etc.? 2. Should I attempt a variety throughout my experience? 3. How much will supplies and ingredients cost me? 4. Where shall I find recipes to try? 5. If I lack certain supplies, such as a type of pot or pan, how will I obtain them? 6. Which cooking techniques would I like to use in this experiment? 7. How much time will I need? 8. Which dishes interest me the most? 9. With whom shall I share the products of my experiments? 10. Who will clean up the mess I make? Option B: Violin I have always loved the sound of certain musical instruments--especially piano, cello, and the violin. I never learned how to play an instrument, but it's something that I've always considered a possibility for the future. One song I would love to learn to play if I chose to learn the violin is the Overture to "The Phantom of the Opera." It is a beautiful piece, but I imagine that it would be difficult even for advanced learners. Questions: 1. Where would I find a violin? 2. Should I purchase it or is rental an option? 3. How much will a violin cost me? 4. What kind of maintenance does a violin require? 5. How do I read sheet music? 6. Is the Overture too advanced a piece for an absolute beginner like me? Should I start with something simpler? 7. From where would I obtain sheet music? 8. Is a traditional violin better or should I choose an electric version? 9. What will I do if my "music" causes a disturbance for my neighbors? 10. How challenging will it be for me to learn to play the violin? |
AuthorI graduated from California State University, San Marcos with a B.S. in Mathematics and now I am pursuing a Single Subject Teaching Credential in Mathematics. Archives
May 2016
Categories |


 RSS Feed
